Foodiva's Kitchen: February 2011

Sunday, February 20, 2011

International Incident Party: Healthy Breakfast Sundae


The theme for this month's IIP is Sundae. I looooove ice cream and desserts to my own detriment because this sweet addiction often translates into an annoying but rather endearing "muffin-top".While doing some *cough* research on this theme, I came across a sundae served in a hot dog bun and while I thought it was an interesting concept, I'm not sure if I'd be tempted to eat that sundae, even while holidaying in Thailand.  It's like combining last month's theme (Hot Dog) with this one's! Totally absurd.

I decided to go in a different direction, creating my own twist on the old ice cream sundae. Prepare to set aside any guilt, for you can eat my sundae for breakfast. Now ice cream for breakfast isn't as crazy as it sounds when you think about the amount of sugar-soaked calories in a typical stack of pancakes, smeared jams on toast and a bowl of processed cereal. And when you consider that this ice cream is eggless (sadly, not cream-less) and machiavellianly made with oatmeal, the whole concept starts to feel vaguely *winks* healthy.

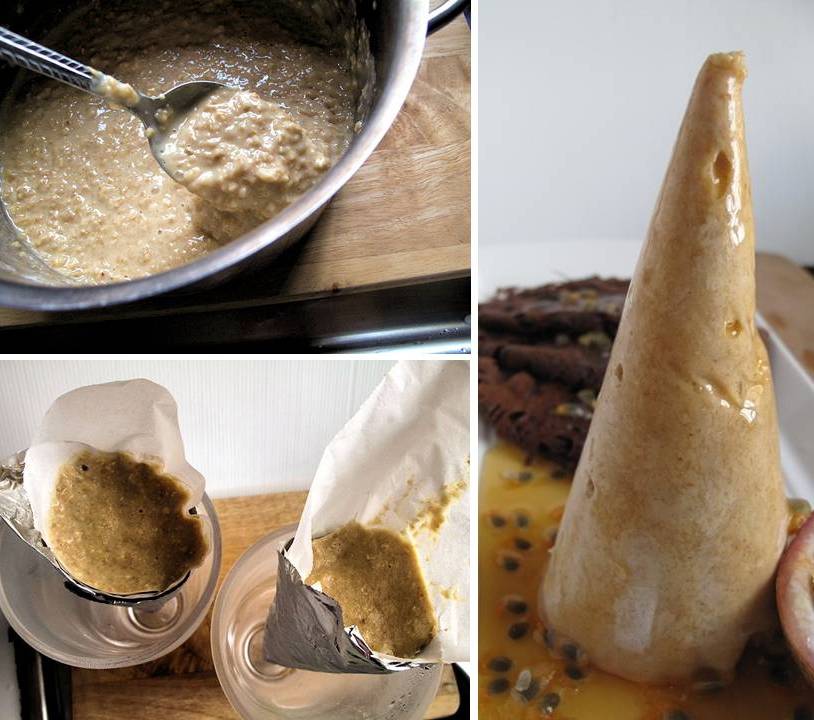
The other twist is that instead of serving the ice cream in scoops as per usual in a sundae, these frozen babies were shaped into cones. Upside-down cones, yes sure, but conically-shaped nonetheless to pay homage to the most popular way of eating ice-cream (a.k.a. in a waffle cone).


So that’s the ice cream part sorted out, but where’s the actual Sundae, you ask? I started to grapple with the idea of a healthy dessert that can actually be eaten for breakfast without any guilt. Well, not much guilt, I should say. After a bit of umm-aahhing, I decided to serve the breakfast sundae in the following ways:

1. Oatmeal Ice Cream Sundae with Chocolate Roti Jala, topped with Honey-Passion Fruit Sauce, and...

2. Oatmeal Ice Cream Sundae with Apple Waffle, topped with Blueberry Yoghurt
and Toasted Almonds.

Roti jala or “net bread” are lacy, net-like pancakes or crepes (they’re very thin) that are popular in Malaysia and around this region in general. They are created using a special deep ladle with several syringe-like holes at the bottom where the runny batter can flow through into the hot pan. Normally, they would be served as a savory item alongside a meat or curry dish, and they would be yellow in color due to the turmeric powder used. However, here I decided to make a chocolate version of roti jala. Drizzled with the honey-passion fruit sauce, they proved to be a perfect accompaniment to my oatmeal sundae. I just couldn’t photograph all my steps quickly enough before the crepes started burning, so here’s a good video to show you how it’s cooked.


The other breakfast sundae version with apple waffle wasn’t too bad either. I just don’t think I need to go into a lengthy explanation on what constitute waffles, and no, no, I didn’t make the blueberry yoghurt myself – it was store bought. Once the ice cream lost its conical shape and melted into the roti jala/waffles (it took a fair while as the oats were pretty good at holding everything together), the guilt factor of having to eat both of these breakfast sundaes in one sitting melted away as well... ;-)


Thank you Penny a.k.a. Jeroxie for being a fabulous host, as always! Do check out the other sundae creations by some of the most talented bloggers I know by clicking on their thumbnails below.

Eggless Oatmeal Ice Cream 'Cones'
(makes 3/4 L)
Ingredients:
100g brown sugar
1 tablespoon glutinous rice flour
1/4 tsp salt
200ml single cream
200ml milk
250g quickcook oatmeal

Method:
1. Place all ingredients in a saucepan and whisk to combine. Bring mixture to simmer over medium heat, stirring constantly. Cook until mixture has fully thickened, about 1-2 minutes. Let cool completely either in an ice bath or in the fridge. I put mine over the ice bath, while stirring to quicken it. Pour into ice cream machine and churn according to manufacturer’s instructions.
2. In the meantime, prepare cone moulds. Cut four 20cm x 25cm sheets of baking paper. Trim four sheets of A4 paper or aluminium foil into the same size. Lay a baking paper sheet over a sheet of regular paper or foil, bring top right corner down to the middle of the paper and roll to form a cone shape. Secure with a sticky tape. Repeat with the other papers and place each cone in 4 tall slim glasses or containers.
3. Scoop the soft ice cream mixture into the paper cones, packing down ice cream tightly and leveling the top. Transfer to the freezer for at least 6 hours or overnight. To serve, remove tape and unwrap paper. Invert cones onto serving plates.

Chocolate Roti Jala
Makes 4 net pancakes
Ingredients:
1 cup of all-purpose flour
2 tablespoons Dutch-processed cocoa powder
2 tablespoons cinnamon sugar
1 1/4 cup of milk
1 tablespoon butter, melted

Method:
1. Mix all the above ingredients thoroughly. There should not be any lumps. You can either pass the batter through a sieve or blend the mixture in a blender to get a smooth mixture.
2. Heat a non-stick pan and brush lightly with some melted butter. Fill 1/4 of the roti jala mold with the mix and move it over the hot pan in a continuous spiral motion. Hold the mold close to the pan otherwise the mixture will form into droplets rather than continuous strings of batter. (If the batter is too thick or does not flow well, add 1 tablespoon of vegetable oil to the batter).
3. It cooks very fast, about a minute so make sure you keep your eye on the pancake. Lift the edges and fold the pancake into half, then into half again to make a wedge/triangular shape.

Apple Waffles
Makes: 4
Ingredients:
1 ½ cups all-purpose flour
1 teaspoon caster sugar
1 tablespoon baking powder
1 large apple, peeled, cored and finely chopped
¼ teaspoon ground cinnamon
¼ teaspoon salt
2 large eggs
1 cup milk
¼ teaspoon butter, melted

Method:
1. Preheat a waffle iron and oil as required.
2. In a bowl, whisk together the flour, sugar, baking powder, apple, cinnamon and salt with a fork. In another bowl, beat the eggs with an electric mixer on medium speed until foamy. Combine the two mixtures, blending until the dry ingredients are well moistened and the batter is smooth.
3. Pour ½ cup of the batter onto the waffle iron and bake according to the manufacturer’s instructions. Remove waffle from the iron and continue until all the batter is used.

Honey-Passion Fruit Sauce
Ingredients:
1/2 cup honey
1 passion fruit

Scoop the passionfruit contents and mix into the honey. Use as a topping by spooning onto ice-cream and pancakes.

Two ways with the Healthy Breakfast Sundae:
1. Make the roti jala, place oatmeal icecream on top or side of it and drizzle generously with the honey-passion fruit sauce. Serve immediately.
2. Make the apple waffle, place oatmeal icecream on top and drizzle with blueberry yoghurt. Sprinkle with some toasted almonds. Serve immediately.


Saturday, February 19, 2011

Forever Nigella - White Chocolate and Passionfruit Mousse

Put “eat chocolate” at the top of your list of things to do today. That way, at least you’ll get one thing done.
Rules of Chocolate

I've always been a bit apprehensive about making mousse from scratch. I suppose the thought of perfectly fluffed-up egg whites collapsing into pool of slimy goo in the serving dish hasn't exactly encouraged me into making this delightful dessert more often. Well, that was about to change the day I made this White Chocolate and Passionfruit Mousse. Of course, the white chocolate sealed the deal because any dish with chocolate in it is instantly elevated a few notches in my biased, sweet-toothed view.

Served in frozen passionfruit shells...how's that for guilt-free portions? ;-)

Everything about this dessert, I later found out, is a study in contrasts. The richness of the white chocolate against the light texture of the mousse. The sweetness of the (again) chocolate versus the refreshing tartness of the passionfruits and plums. The pale, yellow color of the mousse set against the dark, crimson hue of the plums. The only uncomplicated thing about this dish really is the recipe, which can be found at Nigella.com. No wonder we love Nigella, and no wonder we are seduced by her...umm, ways with chocolate!


I was lucky to have come across fresh passionfruits in the market recently, so I had several in my pantry I could use to make this mousse. The original recipe also called for fresh raspberries, which of course, are near impossible to find right now so I ended up using red plums instead. The substitute fruits didn't affect the overall flavor combinations one bit and best of all, the white chocolate mousse held up. I think I may have finally made my peace with mousse...


Of course, being the unabashed glutton that I am, I made these in individual glasses instead of a large serving dish. Each glass, you may be interested to know, has a more-than-one-but-less-than-two-servings capacity. Well, it may be slightly 'less-than-three', but the point here is to divide it any way you wish to eat it. Whichever way you choose to apportion this dessert, I'm sure Nigella would approve as long as you then eat it with a knowing smile and a naughty glint in your eye!


I'm sending this post to the second Forever Nigella event kindly hosted by Sarah of Maison Cupcake. It's always fun to support fellow bloggers in their initiatives, and of course, a great way for me to see what delicacies the other participants bring to the table!

Monday, February 14, 2011

Tropical Valentine: Tuna Cakes with Banana Chutney and Green Curry Dip


Blue waters. Sunny, clear skies. Warm, breezy weather. Check.
Cold, tall thirst-quencher in hand. Check.
Valentine's Day. Check.
Spicy nibbles, condiments and dip. Double-check
Hot, sizzling date. Uncheck.

Okay, so today is Valentine's Day. Not a day that's normally commemorated in our household, but on this blog, nothing's truly normal. You know that saying, "Two's company, three's a crowd"? You'd think that would be an apt phrase for Valentine's when lovebirds (traditionally two people) have a good excuse to cozy up to each other. But not in this realm.

Today, three of us are paying tribute to a day reserved for love (not that everyday isn't) by each trying out a recipe from the Tropical Asian Cookbook compiled by Wendy Hutton. Our tasteful threesome is made up of Trix (Tasty Trix), Penny (Jeroxie.com) and myself, blogging out of three of the most happening spots on this planet (see below). Well, okay.... maybe two.


How did this come about? On the very last day of 2010, I held my first giveaway which was this beautiful cookbook, and the happy winner was Trix. Since we both have a copy of the same book, we thought why not cook something tropical-themed together out of it? And as we are of the "three's company, two's a bore" school-of-thought, we roped Penny in to join us! 


The book is a compilation of recipes from the prestigious Four Seasons Hotels all over Southeast Asia and South Asia. It features dishes from Singapore, Thailand, Malaysia, Indonesia, Vietnam, Maldives and India. My tuna cake with its simple homemade paratha-like pastry and chutney is reminiscent of a South Asian/Indian dish, while its green curry dip is distinctly Thai. I chose this tropical noon nibbles because I admit, it was the visual that first drew me in. The way the chef (and I presume, the food stylist) presented the dish in the book was stunning... my pictures here don't even come close.

Then I got to studying the recipe and went "Oh my gawd!". No, it wasn't too complex to make, it just seemed that the list of ingredients went on and on and on... On the bright side, everything listed there was easily accessible to me (and you too, I imagine). And so quickly running out of excuses, I decided to forge ahead and make this. Let me tell you, regret it I did not, for the flavors of the tuna cakes when combined with the kick-ass spiciness of the green curry and the sweet heat of the banana chutney were out of this world! Imagine a fireworks display taking place in your mouth, it's not the heat you're concentrating on but the beauty of the explosions.

Tuna cake ingredients

I shall not say too much more but leave you to lovingly stare at all the ingredients. My kitchen was turned upside down for an afternoon making these, but the thought of lovingly handfeeding these tuna cakes to some  (mythical, hot) loved one overrode all painful thoughts of cleaning up. In the end, it was my nephew who scoffed about six of these tuna cakes in one sitting. He declared them "really yummy",  so I guess I can officially elect him my Valentine this year.

Banana chutney ingredients, using curry leaves and bananas from my garden.

Green curry dip ingredients.
I somehow forgot to take a shot of the cilantro and mint - the two major green contributors!
Chilies galore!

Trix has made the spinach kofta with eggplant puree, a delight for vegetarians, while Penny made a lovely thirst-quencher, rose flavored lassi with pistachios to wash all the tropical flavors down. For a complete picture of our Valentine's Day meal inspired by the tropics, remember to head over to their blogs and check out their posts too!

Tuna Cakes with Banana Chutney and Green Curry Dip
Makes 8
Ingredients:
Pastry
1 cup flour
Pinch of salt
1/3 cup water
1 tablespoon vegetable oil

Tuna Filling
2/3 cup (100g) firmly packed drained canned tuna
2 tablespoons very finely chopped onion
2 tablespoons very finely chopped cilantro (coriander) leaves
2 tablespoons freshly grated or moistened desiccated coconut
2 teaspoons lime juice
Salt to taste

Banana Chutney
2 teaspoons vegetable oil
1 teaspoons mustard seeds (I used Nigella seeds)
10 curry leaves
2 dried red chilies, soaked in water 5 minutes, roughly chopped
2 medium ripe but firm bananas, roughly mashed
6 tablespoons fresh orange juice
1 teaspoon turmeric powder (optional)
Salt and black pepper to taste

Green Curry Dip
4 teaspoons finely chopped ginger
4 teaspoons finely chopped garlic
1 large green chili, chopped
1 cup coarsely chopped fresh cilantro (coriander) leaves and fine stems
1 cup coarsely chopped fresh mint leaves
2 tablespoons coconut or vegetable oil
1 teaspoon brown mustard seeds
1 teaspoon cumin seeds
1 large onion, chopped
10 curry leaves
1 large tomato, peeled and chopped
2 teaspoons curry powder
3/4 cup coconut milk
1/2 teaspoon salt

Method:
1. Prepare the tuna filling by combining all ingredients in a bowl, mixing well. Set aside.
2. Combine flour, salt and water in a bowl. Knead for 5 minutes to make a pliable dough. Divide into 8 balls, then flatten each with the palm of your hand. Press with the thumbs and fingers to make each ball into a circle about 3 1/4 in (8cm) in diameter. Fill each circle with one-eighth of the tuna, then lift up the sides, pleating and squeezing them to the centre to enclose the filling. Flatten gently into a cake about 2-in (5cm) in diameter , then heat 1 tablespoon oil on a large skillet and sear the tuna cakes until golden brown, about 1 ½ minutes on each side. Transfer tuna cakes to a baking tray and bake in an oven at 350F (180C) for 8 minutes.
3. To prepare the banana chutney, heat oil in a small pan and add mustard seeds, curry leaves, and dried chilies. Stir-fry until the seeds crackle, then add the banana and mix well with a wooden spoon, cooking for 1 minute. Stir in the orange juice and turmeric, and season with salt and pepper, then transfer to a bowl. Cool, then chill in the refrigerator.
4. For the green curry dip, process Ginger, garlic, chili, cilantro and mint leaves together to make a smooth paste. Heat the oil in a pan and add mustard and cumin seeds. Stir-fry over medium heat until they crackle, then add onion and curry leaves. Stir-fry until the onion softens, 3-4 minutes, then add tomato and cook 5 minutes.
5. Add the blended paste and cook, stirring frequently, 4-5 minutes. Pour in coconut milk, add salt and bring slowly to a boil, stirring. Simmer uncovered until the sauce thickens, about 8 minutes. Taste and add more salt if desired.
6. Serve the tuna cakes with banana chutney and green curry dip.

Thursday, February 10, 2011

Cupid's Cobbler: Plums with Rose-Basil Seed Cream

“Your heart is my piñata.”
  Chuck Palahniuk

I'll be the first to tell you that I'm no romantic. Not that I'm opposed to being wined, dined, pampered and adored by people whom I adore in return. No, in fact I've had more than my fair share of being spoiled rotten, so why the heck do I find it hard to return the favor? Maybe it's because I'm way too practical and analytical for my own good that I uhh... never really initiate anything special for Valentine's Day. Well, not wholeheartedly, anyway. :-)

But Valentine's next week, and I feel like I have to at least show the people around me how much they're loved and appreciated, and since I don't say that often enough, I'm hoping that this heart-pumping cobbler would speak volumes. There's an abundance of plums right now, so I've used both Black Amber Plums (purple) and Fortune Plums (red) and topped them with heart-shaped sweet cream biscuits to make this non-traditional cobbler. Try presenting this dish to someone and see if it doesn't make their heart melt. (If it doesn't, then may I suggest that perhaps that person doesn't have any business being inside your emotional space, hmm?).


I have this family of heart cookie-cutters that were still in their packaging, even though it's been a year since I'd bought them. I'm not sure why I'd even gotten them actually... to use in case of emergencies, I suppose. Or for Diva D for when she makes her lovely cookies. Or maybe I was hoping to get soppier with increasing age. In any case, I reckoned all passionate bakers should have at least one heart-shaped cookie cutter in their arsenal of baking tools.


So no, I haven't suddenly gotten all mushy in the run-up for Valentine's when I baked this. What I have become with age (and a big dose of hindsight) though, is appreciative. So you could say that I wanted to show my appreciation to my loved ones by presenting them with my very own version of Cupid's Plum Cobbler.

Now, plum is not the first fruit you would normally think of when you're hoping for some sweet loving. Neither would you think of a cobbler being the food of romance, it just dawned upon me. Grapes or strawberries dipped in chocolate would be what I imagine you'd order from room service to get you through an evening of passion. But wait, you don't know this cobbler like I know it!

Apart from the creamy biscuit topping, the plums are flavored with orange, and served with rose-scented cream that contains....wait for it... soaked basil seeds! Seeds of several basil varieties become gelatinous when soaked in water, and here in Asia, we frequently use them in drinks and desserts. In my home, a favourite use of basil seeds is to add them to pink rose syrup, called air bandung. It gives the drink a bit of a crunch and basil seeds also help the body cool down  on a hot day. On their own, they don't actually taste of anything.

I think of frog spawn whenever I see this... but don't let that statement put you off! 

Audacious? Yes, quietly so. Hopeful? Oh yes, definitely so! Now..... where is that honey of mine?


Clandestine basil seeds

Plum Cobbler with Rose-Basil Seed Cream
Serves 6
Ingredients:
Filling
10 ripe plums, pitted and sliced into wedges
1/3 cup caster sugar
1/4 cup all-purpose flour
Finely grated zest of 1 orange
2 cups freshly squeezed orange juice
Pinch of salt

Cream Biscuits
2 cups all-purpose flour
1 teaspoon baking powder
125g cold butter, cubed
1/2 cup thickened cream
1/2 cup milk
Extra milk, for brushing
2 teaspoons caster sugar

Rose-Basil Seed Cream
300ml thickened cream
1 teaspoon vanilla extract
2 teaspoons rosewater
1/4 cup caster sugar
1 teaspoon basil seeds, soaked for 5 minutes

1. Preheat oven to 200C. Prepare filling by combining plums, sugar, flour, orange juice and zest, and salt. Pour the mixture into a 22cm round baking dish and bake for 15 minutes until the fruit is softened.
2. Meanwhile, prepare the cream biscuits topping. Mix the flour, baking powder in a bowl with a fork. Add the butter and rub the flour into the butter with your fingertips. Work quickly until the mixture resembles coarse breadcrumbs. Make a well in the centre and radually add the cream and milk. Stir briefly until the dough just comes together (it'll still be a bit soft and sticky).
3. Turn dough out onto a floured surface and knead quickly 8-10 times until smooth, but don't overwork the mixture. Gently flatten to with a rolling pin to about 1.5 cm thick. Flour a heart cookie cutter and cut enough shaped doughs to cover the top of the cobbler.
4. Remove the dish from the oven and reduce the heat to 180C. Top the fruit with the biscuits, brush with extra milk and sprinkle with sugar. Bake for 30-40 minutes until biscuits are golden and the fruit is bubbling.
5. For the rose cream, combine cream, vanilla, rosewater and sugar. Whisk to soft peaks before stirring in the drained basil seeds. Cover and chill until needed. Serve the cobbler warm with rose cream.

Wednesday, February 9, 2011

Rosewater Macadamia Mini-Tarts

"The Queen of Hearts, she made some tarts, All of a summer day: The Knave of Hearts, he stole those tarts And took them quite away!"

Dodgson
Alice's Adventures in Wonderland, ch.11, 'Who Stole the Tarts?'.

Whenever I think of macadamia, I automatically think of Australia and Hawaii. That's because during my younger days, friends or relatives who had travelled to these faraway lands (when I was young, the world seemed bigger) frequently brought us back chocolate-covered macadamia candy as gifts from their trips. As an adult, I learnt that macadamia nuts are actually native to Australia, but were imported to Hawaii where they thrived. They are apparently also now grown in New Caledonia and Indonesia.

When I bought my big bag of macadamia nuts (unshelled....urrghh), I knew I wanted to make tarts with them. The buttery-flavored nuts would be soft enough to cut through with a knife and would be perfect as a tart filling. On its own, though, I felt it wouldn't give enough of a kick and all of you who visit here often would know that I'm all for tastebud-titillation when it comes to anything I bake. Macadamia always tastes heavenly with orange or chocolate but as usual, I resisted the temptation to go with the norm. It was my James Dean-rebel gene exerting its dominance in the kitchen yet again.   


So I think of Rosewater, and flashes of Indian sweets (gulab jamun), Turkish Delight and air bandung (pink rosewater-flavored, sweet drink) cross my mental palate. The possibility of a floral, buttery, nutty-flavored tart seemed more tempting and was definitely more my style. Subtle but memorable. No mere coincidence then that my life is reflected in many of my baked goodies...

Rosewater lending a floral note to the pastry and filling.

When it comes to making an undeniably tasty crust, I like to use the rather nutty, low-gluten and easier-to-digest spelt flour. Although my crust is not butter-less (fat chance!), it is eggless as spelt makes the dough stickier to work with. And I incorporated just enough Rosewater in the dough (as well as the filling) to enable you to detect the floral note as you bite into the tart. I'm partial to eating flowers, what can I say?


Shelling brings me no joy.... but oh, anything for the buttery nut!

Apart from the nailbreaking session with the macadamias, this was probably the one of the easiest tarts I have ever made - and I don't say that lightly because I've made many easy tarts. Cooking and prep times are also minimal, so this is a good one to impress guests for when they drop by darnedly unexpectedly.


The custard filling rises in the oven but falls and wraps itself around the nuts upon cooling.

It's a known fact that incorporating macadamia nuts into a heart healthy diet can reduce cardiovascular disease risks. Macadamia nuts have higher levels of monounsaturated fats, like those found in olive oil compared with other tree nuts. I had actually piped melted, white chocolate over several of these tarts but I'm not showing you them so that we can all keep to the perception that these mini-tarts are indeed, healthy. ;-)


Rosewater Macadamia Mini-Tarts
Makes: 9 mini-tarts (2½ inches wide)
Ingredients:
Spelt Rosewater Crust
250g spelt flour
125g cold butter, cubed
2 to 3 tablespoons Rosewater*
(*you can get this at Asian culinary stores)

Macadamia Cream Filling
200g whole macadamia nuts, shelled
1/3 cup brown sugar, packed
1/3 cup heavy cream
2 tablespoons corn syrup
1 egg
1 ½ tablespoon Rosewater

Method:
1. Make the crust first: in a bowl, rub the cold butter into the flour until the mixture resembles breadcrumbs. Make a well in the center of the mixture, gradually add Rosewater and knead the flour into a pastry ball.
2. Preheat oven to 180C. Divide dough into 9 balls, take one and press onto the base and sides of a mini-tart pan (1-cm deep) to form the crust. Repeat with the rest of the dough balls. Prick the base of the crust with a fork several times to release hot air while baking.
3. Place tart pans in the oven and bake for 10 minutes.
4. In the meantime, prepare the custard cream filling. Whisk the brown sugar, cream, corn syrup, egg and Rosewater for about a minute until well-combined.
5. After 10 minutes, remove the semi-cooked spelt crust from the oven. Arrange a layer of macadamia nuts on the base of each crust and carefully pour the custard cream on top of the nuts, filling it until you just cover all the nuts.
6. Bake at 180C for 15 minutes until custard is just set. Remove from the oven and leave to cool on a rack for about 10 minutes. Mini-tarts can be served warm or cool with ice-cream or whipped cream.


Saturday, February 5, 2011

Bread Pudding Club: Cinnamon-Tangerine Bread Pudding


At the age of 15, I was sent off to boarding school. There was nothing particularly wrong with the food at boarding school, but there was no choice of menu and you were forced to eat whatever was served up. We never ate bread and butter pudding at home but at that school, we had it for lunch nearly every week. Since it was quite novel to me, I grew to love this British dish instead of hating it just because we had it so often at school (if you saw how they served it at the cafeteria, you would wonder why... its presentation in the large buffet trays was downright dog ugly!). Now anytime I come across bread pudding, it takes me right back to my boarding school days. Oh the joy!

When my friend Victoria of Mission Food mentioned that she was starting a Bread Pudding of the Month Club, I was immediately inspired by the vision of presenting this humble, homely dish as something a bit more exciting flavor-wise that I... gatecrashed her party. Ok, she did kindly invite me to join her in posting this bread pudding recipe (after I asked her). So, many thanks Victoria, for this fun opportunity and for your generosity of spirit.


Just about every culture that makes bread has its own version of bread pudding. The breads of Asia, though are quite different to European types of bread as many are unleavened. There are some which use yeast, yet are not baked in large, light loaves which lend themselves to slicing. They are somewhat flat compared to Western bread, but have very special flavors. Asian breads are not usually baked in an oven, since ovens are not normally a feature of the average Asian kitchen. Instead, they are griddle-baked, shallow fried or deep fried. In the case of Chinese breads, they are steamed in bamboo steamers or any other kind of steamer available. Most Asian breads are found in South Asia (India, Pakistan, Sri Lanka) and other countries where the Indian influence is strong.

Hailing from neither China nor South Asia, bread was never a traditional staple for my family. You will understand when I say that I've only ever made bread pudding at home twice in my life. This was to be my third time, so I decided to take things easy. Easy on flavors, I mean. This time of year coincides with Chinese/Lunar New Year and as usual we are inundated with oranges, tangerines, satsumas, kumquats, etc. What better way to incorporate the abundant citrusy flavor than in a bread pudding, hey?


I used tiny-sized tangerines as they're seedless and the segments could be tucked nicely in between the bread slices. Cinnamon pairs well with the sweet, tangy taste of the tangerine, which pops in your mouth as you take a bite of the pudding. Orange-flavored caramel sauce poured over the cooked pudding and a dollop of whipped cream completed the dish. It was pretty good for my third ever experience baking bread pudding, and I can't wait for the next time! 


Victoria has created a special, tropically-inspired bread pudding today. If you want a whiff of her wondrous Piña Colada Bread Pudding below, you should head out to her site now!


Cinnamon-Tangerine Bread Pudding
Serves: 6
Ingredients:
8 slices stale bread
50g cold butter
1 litre milk
1 cinnamon stick or 1 teaspoon cinnamon
4-5 cloves
2 eggs
3/4 cup brown sugar
4 tangerines, peeled

Orange Caramel Sauce
1 cup freshly squeezed orange juice or regular orange juice
1/2 cup heavy cream
2 tablespoons unsalted butter
1/2 cup granulated sugar

Method:
1. Remove the crust from the bread and slice each bread diagonally into 4 triangles. Chop the crust into small chunks and set aside.
2. Butter a shallow baking dish (1-2 inch deep) and leave the rest of the butter for later.
3. Arrange the bread slices along the base of the tart dish, leaning against each other in one layer. Fill the gaps along the outer edges with the chopped crust.
4. Slice/shave the cold butter on top of the bread slices.
5. Separate the tangerines into individual segments, peeling away using your fingers. Slide in 1-2 tangerines into the spaces between/behind the rectangular bread slices.
6. Place the milk, cinnamon and cloves in a pan and heat until just starting to boil, stirring constantly to prevent the milk from burning. Remove from heat and set aside while you prepare the egg mixture.
7. Whisk eggs and sugar in a small bowl, then add a cup of the warm milk and beat further. Pour this mixture back into the pan with the rest of the milk and stir until it just starts to simmer. Strain the mixture into another bowl to remove the spices and any foam.
8. Carefully spoon the custard onto the bread slices until they are completely soaked and the custard reaches to just below the rim of the tart dish.
9. Bake at 175C for 40 minutes. The pudding will expand in the oven, but will settle down once cooled.
10. For the orange-caramel sauce, bring orange juice to a simmer over medium-high heat in a saucepan for about 5 minutes to reduce. Strain through a fine sieve into a bowl, add cream, and set aside. In another saucepan, melt butter over medium heat. Add sugar and continue to cook, stirring frequently until sugar is lightly caramelized, about 3 minutes. Add the orange juice mixture, stirring constantly. Simmer for 5 minutes and strain through a fine sieve.
11. Serve the pudding warm, drizzle with orange-flavored caramel, top with a dollop of whipped cream and a dusting of powdered sugar.


Related Posts with Thumbnails