Foodiva's Kitchen: December 2011

Saturday, December 31, 2011

Going With The Flow in 2012

The point is, not to resist the flow. You go up when you're supposed to go up and down when you're supposed to go down. When you're supposed to go up, find the highest tower and climb to the top. When you're supposed to go down, find the deepest well and go down to the bottom. When there's no flow, stay still.

~ Haruki Murakami, author of The Wind-Up Bird Chronicle
2012

Ironically, for my last post of the year, I have no profound words nor a new recipe to offer you. A bit strange for a blog, and a food blog at that. I decided not to make any resolutions for the year ahead because, well, I am who I am. If I hadn't already made any significant changes in myself over the last decade or so, I doubt if writing something down on a list will now work to elevate my character. Not that I'm anywhere near perfect, but I'm in a happy place right now and would rather focus on living very much in the present.

Now let me tell you something about this food blog and what it has come to mean to me. Like many other years, this year has had its share of ups and downs but this blog, it's a soothing constant in my universe. I do believe the regularity of writing and interacting with you all has kept me sane. Even though I may have sounded insane at times, believe me, having you guys in my life has made me very, very happy. You (yes, you!) have become like a family member, my additional family to complement my real one.

Of course, our passion for food is the actual thing that binds us all together. Because it is a source of nourishment, I hope we will never get tired of it. Or rather, we shouldn't. I'd wear the adage, "All that you believe about love, change, joy and possibility is revealed in how, when and what you eat" on my apron sleeves if my apron had them. Everything I had ever presented on my plate therefore represents my experiences, the world through my eyes and more importantly, my heart.

And so for my end of year 'share 'n care' package for you, I've resisted posting up my favorite new year song by ABBA and instead have chosen these 3 powerful videos. First and foremost, they are all beautifully shot and composed. Secondly, they contain messages that I think all of us can carry in our hearts over the coming year. 

Robin Thicke's Can You Believe for those crappy days ahead:

Kina Grannis' Strong Enough for those crappy people you're going to encounter, and you are going to meet them!:

One of my favorite commercials showcasing filial piety, for when you forget what's (or who's) important. It's corny and the lead actress shares my name, but if you can look past those details, this ad is extremely touching:

Have a blessed New Year and let's continue having a blast in 2012!

Monday, December 26, 2011

Muffin Monday - Eggnog Muffins

The rays of happiness, like those of light, are colorless when unbroken.
~ Henry W. Longfellow

In most countries around the world, today is a public holiday or at the very least, the day after a public holiday. Whether you celebrated Christmas or not, I hope yesterday was good for you (and yours, if you're with them). I am writing this early, so that when this post gets published, I will be on a beach or in a pool somewhere under the hot sun. Hang on.... that sounds very much like everyday at home. Let me rephrase that - I will be going nowhere far but shall be taking a bit of a blogging break this week to ponder about the things I'd like to happen in 2012. In my life, I mean.


As I'm writing this, it's 3 days till Christmas and I'm feeling bad because most of my seasons greeting cards are sitting on my dresser, not yet mailed. Well, they have to be written in first before they can be posted, and I'm stalling on the writing part. Lately, I seem to have acquired a super-clingy new best friend and she goes by the name, Procrastination. I'm still trying to figure out how to give her the slip.


To cheer me up today though, 'P' (my new friend's nick) and I baked some eggnog-flavored muffins for Muffin Monday. Not having any eggnog essence, we stuck with vanilla and it still tasted great. Just for fun, P suggested we pipe some muffin batter into clean, empty eggshells just to go with the 'Egg'nog theme. She's so entertaining, that girl! 

Well, since I had oh...hours to waste, I agreed and we used this technique by SandeeA to attain our egg-shaped muffins. We didn't make them with the suggested topping in the original recipe, instead we sprinkled some crushed peppermint candy cane over the batter. These eggnog muffins had some serious swag, and they tasted delightful to boot!


Note: Muffin Monday is an initiative by Baker Street. A culinary journey of sharing a wickedly delicious muffin recipe every week. Drop Anuradha a quick line to join her on her journey to make the world smile and beat glum Monday mornings week after week. 


Eggnog Muffins
(recipe from King Arthur Flour)
Makes: 12 muffins
Batter
1/4 cup (1/2 stick, 2 ounces) butter
3/4 cup (5 1/4 ounces) sugar
2 large eggs
2 1/2 cups (10 1/2 ounces) King Arthur Unbleached All-Purpose Flour
2 teaspoons baking powder
1 teaspoon ground nutmeg
1/2 teaspoon salt
1/4 teaspoon eggnog flavor or 1 teaspoon vanilla
1 1/4 cups (10 ounces) eggnog or half and half

Topping*
1/2 cup (3 1/2 ounces) sugar
1/2 cup (2 1/4 ounces) King Arthur Unbleached All-Purpose Flour
1/2 teaspoon nutmeg
1/8 teaspoon eggnog flavor, optional
3 tablespoons (1 1/2 ounces) butter, melted
*(I used crushed peppermint candy cane)

Method:
1. Preheat the oven to 425°F. Line a muffin tin with 12 paper or silicone muffin cups, and grease the cups with non-stick vegetable oil spray; this will ensure that they peel off the muffins nicely.

2. In a medium-sized mixing bowl, cream together the butter and sugar till smooth. Add the eggs, beating for several minutes and scraping the bowl, till the mixture is smooth and light colored. Beat in the baking powder, nutmeg, salt, and eggnog flavor or vanilla.

3. Stir the flour into the butter mixture alternately with the eggnog or half and half, beginning and ending with the flour and making sure everything is thoroughly combined. Spoon the batter evenly into the prepared muffin cups.

4. Stir together all of the topping ingredients JUST till crumbly. Stir gently, and don't overmix; you don't want to turn this crumbly topping into a solid mass. Sprinkle the topping over the muffins.

5. Bake the muffins for 20 minutes, or until they're a pale golden brown. Remove them from the oven, and serve warm, or at room temperature.

Monday, December 19, 2011

White Chocolate and Cranberry Wreath Bread

Break open the forbidden happiness.
~ Rob Brezsny

I suppose I should warn you... this post contains graphic scenes of peace, love, joy, passion, reverence, splendor, and understanding. All in the form of food. So if you're feeling even the slightest bit jaded today, I suggest you proceed to read on with caution or else, come back another day. For this wreath bread is every bit as delicious as it is joyous to look at and what makes it even more splendid is that it is deceptively easy to make. Wish to be the next Bread Idol? Then you should attempt this recipe during the holiday season : ).


Following on from the success of my Happy Bread, a bouquet of pull-apart brioche rolls, I decided to use the same buttery dough and adapt it to the festive atmosphere by adding dried cranberries, candied lemon and orange peel (homemade) and white chocolate chunks. The yeasted wreath idea is nothing new, of course. When I first caught sight of this one on my Bread Idol's blog, Farine, I couldn't get the image out of my mind for weeks and knew I simply had to try making it myself! 


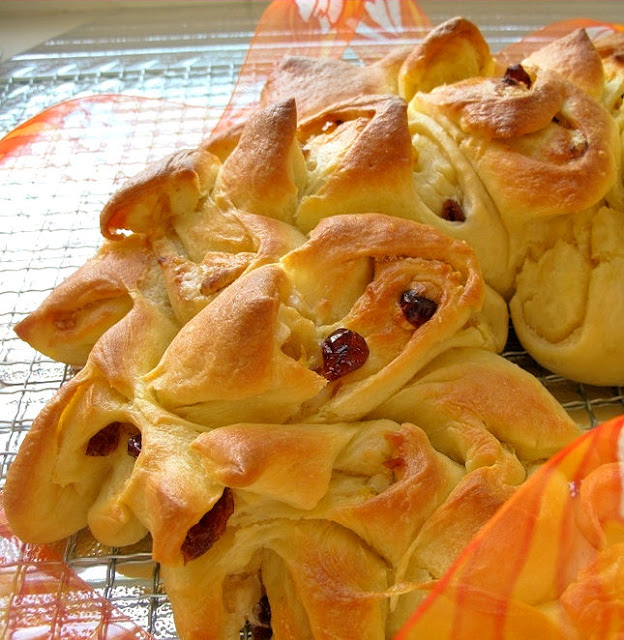
I had plans for a colored, candy-stripey kind of dough but in the end kept it simple as I didn't want any distractions from the decadent flavors. The first wreath bread I made I gave away to a friend, who asked how I created the spiky 'leaves' on the crust to look similar to dragon fruit skin? It was something that never occurred to me before, but once uttered, was all I could think of every time I see the bread spikes....Geez.


As far as I am concerned, you need only three skills to make this incredible bread - kneading, braiding and snipping (with a pair of scissors).  If you're a hairdresser, you're probably already three-quarters on your way towards producing a beautiful wreath bread should you ever want to do so. And oh, you really should want to!

So we've come to the part I have set aside for some reverence and gratitude. I am not kidding when I say how in awe I am of the many, many, MANY people who have pinned (on Pinterest) the picture below and who have baked/are planning to bake this Happy Bread. As a big thank you to you all, I have made a quick video that shows you how the cut dough pieces are magically transformed into the bread bouquet below. Enjoy!


Happy Bread (above) and how-to video (below)


FUN STUFF OVER THE WEEKEND- HARVESTING OUR OWN RICE

Passion. I've never equated it with anything much to do with romance but love, yes. A grand love for life! And speaking of passion, both my parents have a great love for the land. Or rather, growing things out of it. While it's unfortunate that I have inherited none of their mother earth-nurturing skills, I do have a strong leaning towards organically-grown food. Thinking of pure, unadulterated food makes my heart beat faster than say, thinking about Brad Pitt or (gulp) Paudge Behan.


And so via the sheer luck of it all, I was born to parents who happen to own a rather nifty vegetable patch and also acres of farmland on which to grow rice, or as we call that type of land here, padi fields. Last weekend, I managed to drag my sorry ass away from my hectic life long enough to visit the rice fields situated a few miles from our village. My dad is there everyday to oversee the harvesting season and we all enjoy helping lay out the rice grains for drying under the hot sun. Once dry, the grains will be milled to remove their husks and we'll have a supply of rice to last us until the next harvest, sometime next February/March. We are in the midst of the rainy season here now, so it is crucial to harvest the crop quickly on clear, sunny days. The heat from the sun feels so elusive and precious as gold right now. 

Anyway, where was I? Oh yes...peace, love, joy, passion, reverence, splendor, and understanding. Let's hope I've covered everything! 

P.S. I'm sending this post to Yeastspotting over at Susan's Wild Yeast. She also got married last weekend, so 'love' and 'joy' - double-checked!

Cranberry and White Chocolate Wreath Bread
Ingredients:
2 teaspoons dry instant yeast
1 tablespoon sugar or honey
100ml warm milk
1/3 cup dried cranberries
1/4 cup candied orange and lemon peel, chopped
1 orange, juiced
100g white chocolate, finely chopped
500g all-purpose flour, plus extra for kneading and flouring
1 teaspoon salt
2 eggs, lightly beaten
150 ml warm milk (extra)
2 tablespoons olive oil
1/2 teaspoon vinegar or lemon juice
100 g butter, melted and cooled

Method:
1. Dissolve yeast and sugar in 100 ml warm milk, cover and leave in a warm place to rise 10 minutes.
2. Soak the cranberries and candied peel in the orange juice in a bowl and leave for at least 1 hour before use.
3. In another bowl, sift the flour and salt together. Make a well in the middle and add beaten eggs into it, the remaining warm milk, olive oil, vinegar and yeast mixture. Knead the dough with your hands or in your mixer until it separates from the sides of the bowl. Remove dough, place on lightly floured surface and knead for about 10 minutes until it becomes a soft, pliable dough. Place in a greased bowl, cover with a towel and leave to rise in a warm place until doubled in volume - about an hour.
4. Punch risen dough and transfer on a lightly floured surface, divide dough into 3 equal parts. Roll each piece of dough out into a roughly rectangular shape with a thickness of 1/4-inch. Brush cooled, melted butter over each piece. Reserve the rest of the butter for later.
5. Drain the soaked dried fruits, mix with the white chocolate and divide into 3 portions. Sprinkle 1/3 of fruits and chocolate on a buttered piece of dough. Press fruits lightly into the dough so they stick. Take the long edge and roll/ shape it into a rough cylinder. Do the same to each of the other 2 dough pieces.
6. Keep on rolling until you get a 30-inch long rope. (Note: It's best to do it in stages: roll out the first one to about 20 inches, then put it back under the plastic sheet and roll the next one, etc. By the time you come back to the first one, it will have slackened some and it'll be easier to get it to the desired length).
7. When you have your three ropes, braid them into a thick plait, then join the ends to make a wreath. Press ends firmly together. Cover with towel and leave the dough to rise in a warm place for about 30-40 minutes.
8. Preheat oven to 180C. When the dough has risen, brush all over top of the bread with the melted butter. Reserve some butter for when the bread comes out of the oven.
9. Take a pair of scissors and cut 1 to 2-inch "leaves" by snipping horizontally in each section of the braid. (Refer to above video). Continue to snip leaves all around the wreath; the leaves will lift themselves up as the bread bakes.
10. Bake bread for 20-30 minutes, reducing the temperature to 160C after 10 minutes in the oven.
11. Brush bread with the remaining melted butter as soon as it comes out of the oven, cover with a towel and leave to cool for 10-15 minutes before eating.

Friday, December 16, 2011

French Fridays with Dorie - Potato Chip Tortilla


A simple and fun recipe this week, we got to make Potato Chip Tortilla for French Fridays with Dorie. Just as the name clearly states, we had to use potato chips, the very kind that comes out of a bag! I don't know about you, but that to me was thrilling not because of the processed chips but because of the unexpected element and creativity of whoever first thought up the recipe. 


All we had to do was open up a bag of chips, crush them with our fingers (yummy!) and stir them into an egg mixture before frying it into a tortilla. Or rather, a loaded omelette tortilla. I bought myself a bag of crinkle-cut potato chips flavored with Sweet Thai Chilli... seriously delicious on its own but even better in this tortilla. Yes, trust me.


Dorie suggested several herbs such as basil, parsley or cilantro be included in the egg mixture, but I only had fresh purple basil, oregano and spring onions from my garden so I simply used those. And a mild red chilli pepper that I deseeded completely was also added to offer a burst of color to the tortilla. This makes a quick and easy appetizer and is a definite feature in our upcoming dinner parties. The other great thing about this recipe is that you can use more than one type of flavored potato chips (salt and vinegar, mesquite BBQ, hot and spicy, sour cream and chives, etc) which allows you to set up several tortilla stations in your buffet according to the different flavors. Or even have a mix of them in one big serving platter. The boring hostess you certainly will not be!


Our cooking group does not publish any of Dorie's recipes but if you're keen on joining our weekly cook-along, you can get yourself a copy of Around My French Table here. For other versions of this potato chip tortilla, please check out the group's attempts here.

I'll have something beautiful, something festive for you on Monday so watch out for that. You'll want to make it even if you don't celebrate Christmas. Well I did, and gave these away to friends! :)

In the meantime, I wish everyone a brilliant weekend!

Monday, December 12, 2011

The Super-Sized Moon and Muffin Monday: Baklava Muffins with Figs and Rose Syrup Glaze

Tell me what you feel in your room when the full moon is shining in upon you and your lamp is dying out, and I will tell you how old you are, and I shall know if you are happy.
~ Henri Frederic Amiel

I'm thrilled to be joining in Muffin Monday again after a long hiatus. Thank you, Anuradha of Baker Street blog for including me after my rather last minute plea :). Actually, I was quite excited at the thought of baking some special, festive-flavored muffins this holiday season and this week's recipe was no disappointment. Baklava Muffins! Have you ever tasted such a thing? Well, it certainly was my first time having a baklava that's not traditionally diamond shaped, with no sticky, crispy bits of dough flying all over the place upon that first bite.


Wanting to play up the baklava-ness of the muffins, I mulled over ways to incorporate rose flavor into the batter. Using rosewater would've been the obvious way to go, and while I did have it, I also remembered something else I had lying around...just begging to be noticed, eaten or used. They're these flower-shaped, pink rock candy from Ladurée that are infused with natural rose flavor. Everyone else at home stayed away from these because to them the floral scent was 'kinda weird' in a candy, and there was only so much I could eat all by myself. 


I ground the candy up in my grinder and realized I'd just created a two-fer. There was no longer any need for the sugar because the rock candy essentially did the same job, and it contained flavoring too! Pistachios would have made the muffins more authentic to the Middle-Eastern style of baklavas, but alas I had none (no walnuts either) and used almonds instead. Dried figs were thrown in the batter because they reminded me of the bounties of the Mediterranean and Middle East where baklavas are often listed as part of the national cuisine. 

Cooked and glazed

For the topping, I replaced the honey with a pink glaze concocted out of confectioner's/icing sugar, rose syrup and milk. Okay, the pink won't have you instantly exclaiming "Aha, baklava!", but didn't anyone ever tell you not to judge a muffin by its color? If you're one of those who are skilled at word association, you'd probably spot the pink and think, 'Turkish delight', which in turn makes you think of 'Turkey', which then gives you flashes of (no, no, not Christmas!) 'Baklava'. A-n-y-w-a-y..., these muffins tasted pretty darn good, with a pleasantly floral note and soft, pillowy texture. Thanks An for the fab recipe!

Super-Sized Moon

How about that total lunar eclipse ending up with a sombre, reddish-colored moon last Saturday (Nov 10), did you all get to witness it where you're at? This was my second time seeing it this year (last one was in June), but I would have to wait another 2 years to see it again. I decided to stalk the moon and take pictures of the eclipse in progress.

Ever since I can remember, I've always been immensely fascinated by astronomy. If I hadn't been reincarnated as the successfully frivolous blogger that I am now, I believe I would've made an annoyingly awesome astronomer or astrophysicist. I memorize the nomenclature of the stars and constellation shapes in the same way other people memorize their home address or their first love's eye pupil color. 

Anyway, nobody else in the house was excited to join me in observing the moon being gradually covered by the earth's shadow (their reasoning - when you can see it on YouTube, why would you want to watch the real thing as it's happening? They are right of course, but still I find it so sad). So armed with my camera with a lens that only zooms up to 20 times, a large cup of hot chocolate and my faithful neck travel pillow (let's face it, there was going to be a lot of looking up involved), I set about to capture the total eclipse, seen below.


Congratulations on making it to the end of this post. You have no idea how grateful I am that you're interested in anything else here apart from these muffins. I'm off to munch on a baklava muffin now, did I already tell you they are really, good? 

Note: Muffin Monday is an initiative by Baker Street. A culinary journey of sharing a wickedly delicious muffin recipe every week. Drop in a quick line to join her on her journey to make the world smile and beat glum Monday mornings week after week.

Baklava Muffins with Figs and Rose Syrup Glaze
Filling:
1/2 cup chopped walnuts (almonds*)
1/2 cup dried figs, sliced thinly*
1/3 cup sugar (Rose-flavored candy, ground finely*)
1 1/2 teaspoon cinnamon
3 tablespoons butter, melted

Muffins:
1 cup + 7 tablespoons all-purpose flour
2 teaspoons baking powder
1/2 teaspoon baking soda
1/4 cup sugar (Rose-flavored candy, ground finely*)
1 large egg
3 tablespoons unsalted butter, melted
1 cup + 2 tablespoons buttermilk (substitute: 3/4 cup plain yogurt + 1/2 cup low fat milk)

Topping:
about 1/2 cup honey (I used the glaze below instead)

Rose Syrup Glaze*
1 cup confectioner's sugar, sifted
1 tablespoon butter, melted
1 tablespoon rose syrup (Monin brand)
2 tablespoons milk

* These are my variations.

Method:
1. Preheat the oven to 200C/400F and prepare a 12 hole muffin baking pan with liners
2. For the Filling: Mix all the ingredients in a small bowl, set aside
3. For the Muffins: In a large bowl, combine flour, baking powder, baking soda and sugar.
4. For the Topping: Mix the confectioner's sugar with butter and mix. Add rose syrup and milk to make a drizzling consistency and pass through a sieve to eliminate lumps. Set aside.
5. In a small measuring jar, lightly whisk together the egg, buttermilk and butter.
Make a well in the dry ingredients and pour the egg mixture. Stir gently. Its okay if its bumpy.
6. Fill the muffin cups one third, add the filling and then top with the muffin mixture again till the cup is two thirds full.
7. Use any remaining filling as a topping. Bake for 15 minutes until golden brown.
Take out from the oven and transfer to a wire rack, still in the muffin liners. Let cool and drizzle with rose syrup glaze.


Tuesday, December 6, 2011

Crispy Spiral Garlicky Mustard and Rosemary Murukku

It's unrealistic to live your life within such strict parameters.
~ David Sedaris

It's safe to say that this blog leans towards the sweet more than savory side of things. However, despite still baking desserts and sweet breads regularly in my kitchen, I have produced nothing that I truly wanted to post up here. Uninspired baking, I call these wasted sessions. So imagine my surprise when an exciting recipe idea suddenly popped up in my head that was not sweet (and therefore not my forte) but the exact opposite - savory.


I had been wanting to try my hand at making the spicy Indian snack, Murukku, for a while but the thought had been withheld by my lack of a press or a sev maker used to churn out perfect murukku spirals. That is, until I stumbled across a YouTube video showing that it can all in fact be done...solely by hand! Of course, my first attempts at twisting the pliable rice flour dough are not very pretty but at least there is some semblance to the murukkus made by the pros in Indian kitchens across the globe! 


Now, flavor-wise was where I had purposely decided to make it un-Indian. My tastebuds had experienced a sensorial shift recently when a friend gifted me with a substantial packet of crispy, floury tidbits from her travels abroad. The snack was so addictive that I really wanted to recreate it once I ran out of the stuff (which didn't take very long - less than two days). I  tried to dissect the flavor profile and deduced that the snack must've contained a healthy dose of mustard and garlic because no one in the house wanted me to smother them with my enthusiastic kisses even long after the packet had run empty...


So, when the murukku-without-a-press video came along, I immediately knew I wanted to incorporate mustard and garlic in the soft dough and dispense with the traditional Indian spices. I also wanted to utilize my latest fresh herb, rosemary - sown by my mama, of course, and passed over to me so it doesn't wilt and die off at the seedling stage. (To all of you with green fingers, I envy your gift!)

My thriving rosemary plant, photo taken from Instagram (@divababu)

Along this process, there were several other things I discovered:
  • my handling and twisting of the dough was genuinely as pathetic as it looked in the video. That's okay though, I'm not into beating myself up over nothing and will probably get better with practice.
  • when I got tired of the twisting and turning, I made simple snake-like spirals but these unfortunately didn't remain crisp for very long after cooling. Perhaps the dough was still too moist inside, I must investigate this further.
  • this spiral snack does double-duty as the perfect fashion accessory. The fact that you can munch on them in between photoshoots make them extra-covetable. Yep, there will never be any skinny girls on my set!

These are best consumed right after they've cooled down and are still crisp. The flavors meld really well together that the exact combo could be adapted to other cracker recipes as well. The murukku tasted incredibly cheesy, a pleasant surprise, while texture-wise they are very similar to thin breadsticks. Once I figure out how to make them stay crisp when stored in an airtight package or container, I'll be packing them to be presented as gifts over the festive season!

Crispy Spiral Garlicky Mustard and Rosemary Murukku
Makes: 16 spirals (2-inch)

Ingredients:
3/4 cup sour cream
1 tsp finely chopped Rosemary leaves
2 garlic cloves, minced
1 teaspoon mustard powder
1 teaspoon brown sugar
1 tsp salt
3/4 cup rice flour
2 tablespoons all-purpose flour
ground pepper, to taste
2-3 tablespoons extra rice flour, to add if dough is too sticky
oil, for deep frying

Method:

1. In a medium mixing bowl, add all ingredients except the extra rice flour and oil and mix well with a spatula.
2. Knead to form a soft dough using your hands. If dough is still too moist and sticky, add rice flour a tablespoon at a time and knead in.
3. Place a plastic bottle cap on a napkin or serviette. The napkin prevents the dough from sticking to the working surface. Form small balls with the dough and twist out each one into a spiral rope around the bottle cap (please refer to the video above).
Note: The thinner the ropes, the crispier will be the murukku.
4. Heat oil on medium high heat in a pan. Carefully lift the napkin to turn the spirals onto your palm and gently lower into the hot oil. Do this slowly or you will be sad if any of the hot oil lands on your skin :).
5. Fry as many spirals as will fit into the pan without overlapping each other. Once they turn light golden, flip them over and fry other side until light golden. (about 3 minutes each side)
6. Remove spirals from oil onto a paper-towel lined plate. Cool completely before eating. Store in an airtight container or ziploc bag at room temperature. Good for consumption up to a week.

Friday, December 2, 2011

French Fridays with Dorie - Matafan

So we contemplate each other, and we want each other, and I give it life and warmth, and it gives me my reason for living.
Paulo Coelho, The Alchemist
I returned home from my foot massage session to this. Fluffy. Mashed potatoes. Pancakes. Don't these four words sound really good to you? Put them consecutively together in one sentence and you've got the perfect thing to start off or complement your meal, or simply to patch up those pesky hunger pangs. Matafan, that's what they're called in France and this is our French Fridays with Dorie recipe this week. 


You would make these savory pancakes not by way of a regular pancake batter. The potatoes need to be roasted with salt for just over an hour and passed through a sieve or potato ricer. I admit I did neither, instead I boiled little slices of potatoes and mashed them with my old-fashioned potato masher. In fact, preparing the matafan batter only took me a mere 20 minutes or so to do. The photoshoot session might have taken longer to orchestrate.... :).


As I bit into the first matafan, I was expecting a pancake-y texture but it wasn't like that at all. In fact, it tasted a lot like mashed potatoes contained within a pancake! Or perhaps more accurately, a mashed potato fritter. I made mine as blini-sized appetizers, topped with creme fraiche and basil-roasted chicken strips. According to my food-obsessed brain, they were totally delicious and matafan definitely needs to be on our regular rotation from now on.

I bet the other Doristas had their own revelations about matafan, and if you'd like to be in on what they are, have a look here.

Foot massage was great... but these fluffy potato pancakes were even better!

Have a fab weekend, everyone!

Related Posts with Thumbnails